Millions of people use Microsoft Excel to record, organize, and analyze important information. If you fall into this group, you may want to password-protect some of your most important spreadsheets and Workbooks.
Here, you’ll learn a few different ways to add password protection to your Excel files. We’ll also explain how you can store and share those passwords in a password manager, alongside your account logins and everything else that’s important in your digital life.
Keep your important data private
Many Excel spreadsheets contain a lot of sensitive information. If you’re using the software professionally, that could include client contact details, credit card information, social security numbers, or data about your co-workers.
Using Excel for school projects, or to keep your personal life organized? You might still have some spreadsheets that you want to keep private. For example, if you’re planning a surprise birthday party for your partner, you don’t want them to find and open the spreadsheet that breaks down all the food, decorations, and entertainment.
There are many ways to protect your Excel spreadsheets. You can set a password to control who can open an Excel file, and whether they should have read-only or full editing access. Alternatively, you can lock specific worksheets with a password, ensuring that other people can’t change anything by mistake.
Use a password to control who can open or edit your Workbook
If you want to control who is able to open an Excel Workbook, you can do so by setting a password and sharing it with the people who need access.
You can do this in two ways:
Encryption
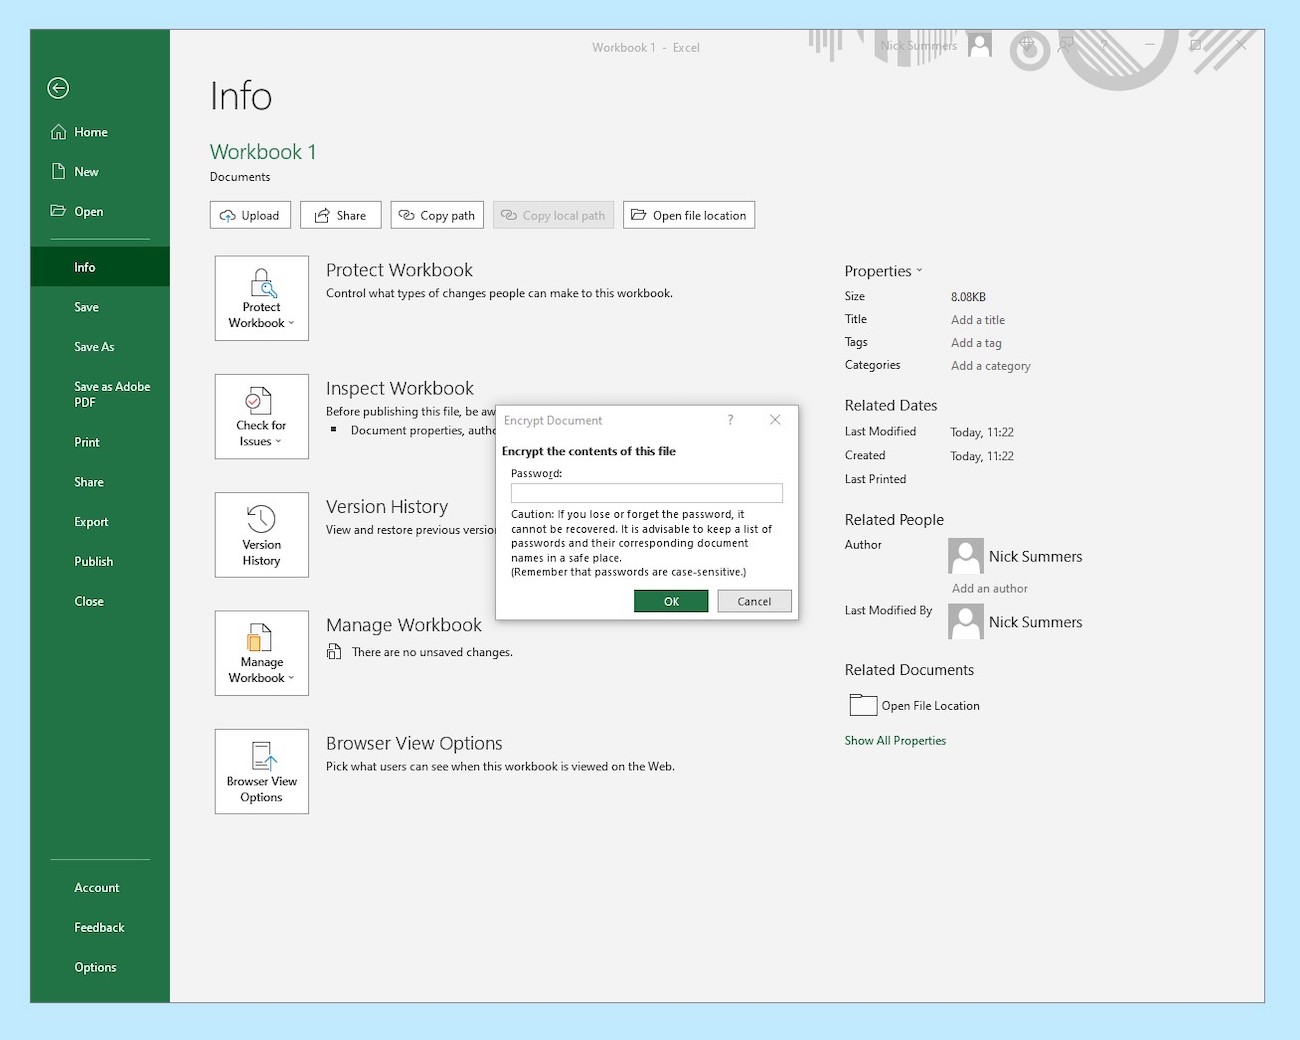
You can encrypt the Workbook, which means nobody can access it without entering your chosen password. To do this on Windows:
- Select File > Info.
- Select the Protect Workbook box and choose Encrypt with Password.
- Enter a password, and select OK.
- Confirm the password and select OK.
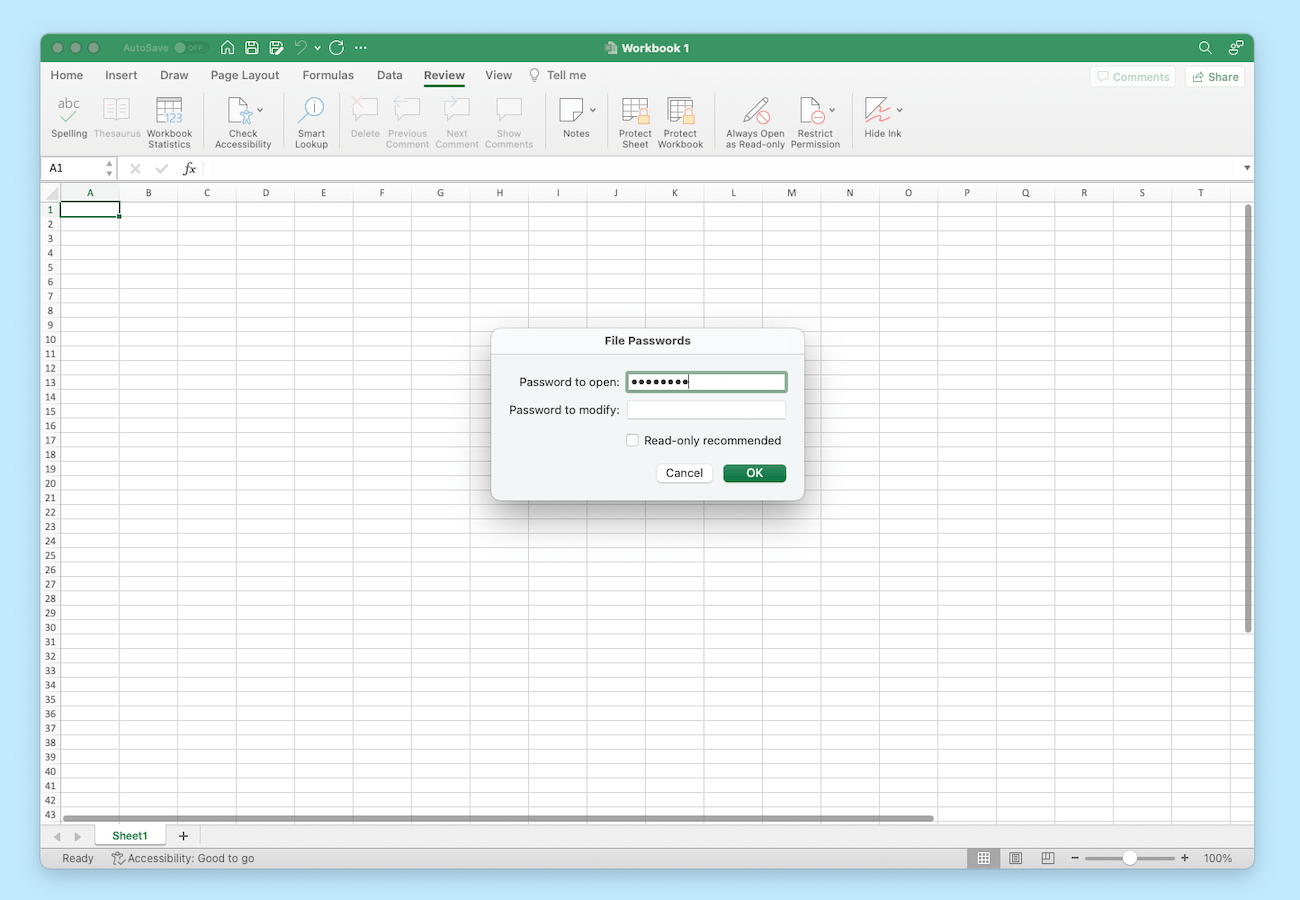
To password protect your Workbook on a Mac:
- Select File > Passwords…
- Enter a password in the ‘Password to open’ field.
- Select OK.
Customize editing access
Alternatively, you can protect your Workbook with two passwords: one to open the file, and another to modify it. For example, if you’re using Excel at work, you might want to give full editing permissions to your manager and read-only access to everyone else. Securing your spreadsheets this way lets you give people different and appropriate levels of access.
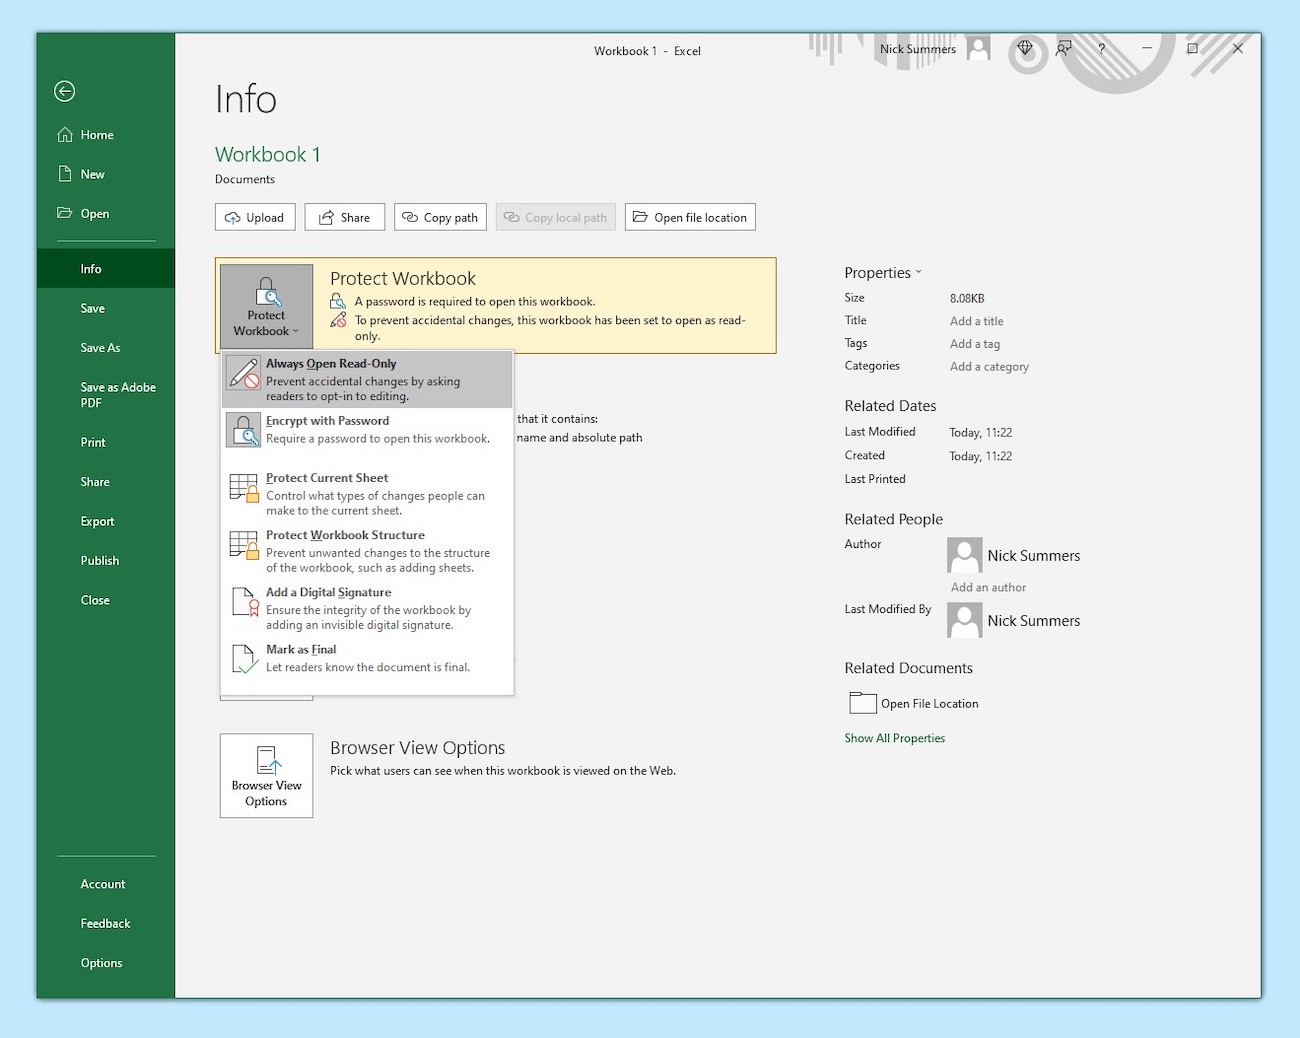
If you’re using a Windows PC:
- Select File > Info.
- Select the Protect Workbook box and choose Always Open Read-Only.
- Enter a password for editing access, then select OK.
- Confirm the password and select OK.
If you’re using a Mac, follow these steps:
- Select File > Passwords…
- Enter a password in the ‘Password to modify’ field. Select OK.
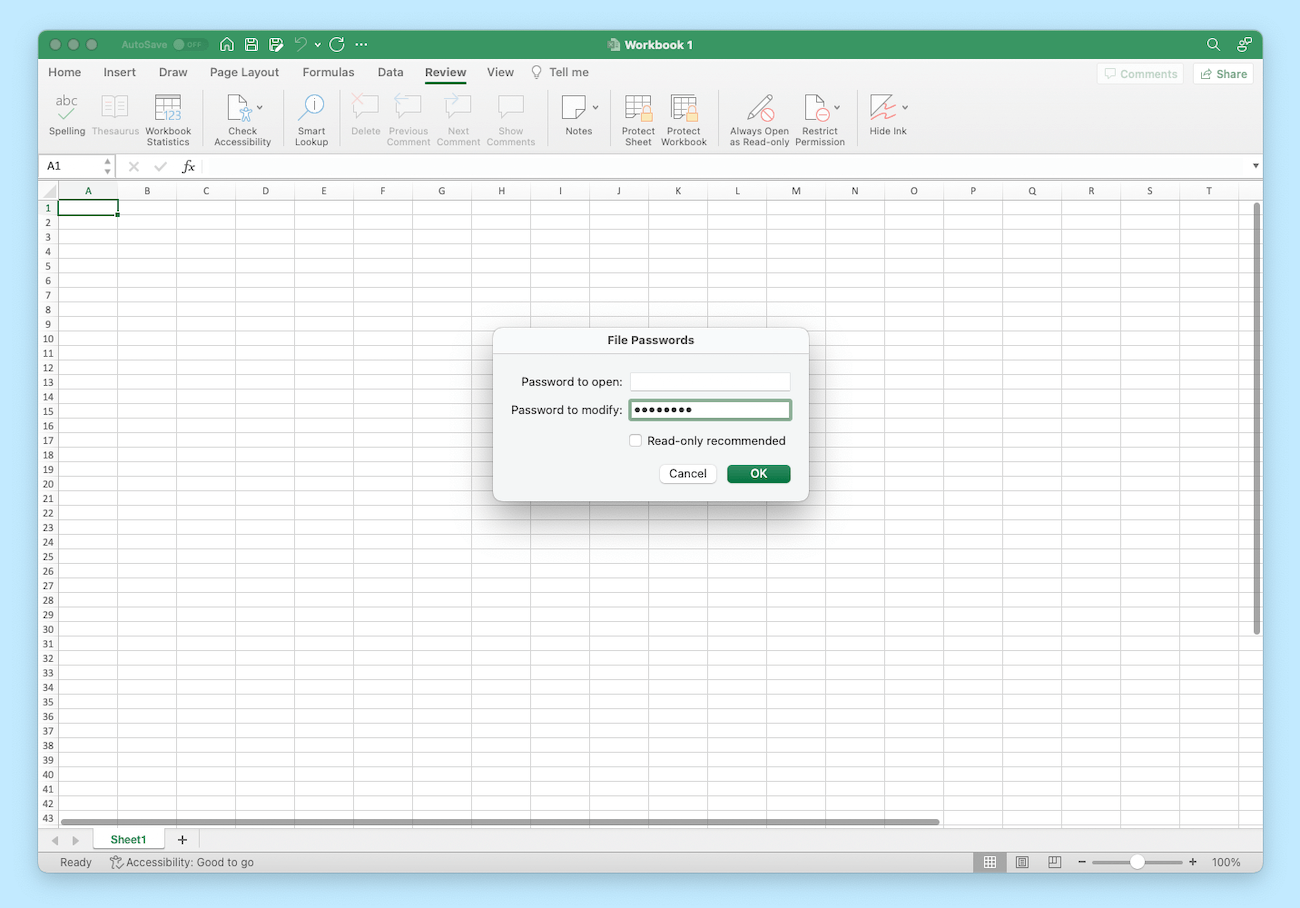
Now, anyone with access to the file must enter a password to access the Workbook as read-only, and another to gain full editing access.
Use a password to control who can change the structure of your Workbook
Another way to protect your spreadsheets is by locking down the structure of your Workbook. Doing this prevents other people from viewing hidden Worksheets, as well as adding, moving, deleting, hiding, or renaming Worksheets they’re not working on, or shouldn’t have permission to change.
For example, let’s say you created a Workbook for a complex team project. If you lock the Workbook’s structure, your co-workers can still contribute data to individual Worksheets – they just can’t alter how the Workbook has been set up and organized.
To lock the structure of your Workbook:
- Click Review > Protect Workbook.
- Enter a password (the password is optional, but if you don’t set one, this feature can be toggled on or off by anyone who can open the Excel file).
- Select OK, re-enter the password to confirm it, and then select OK again.
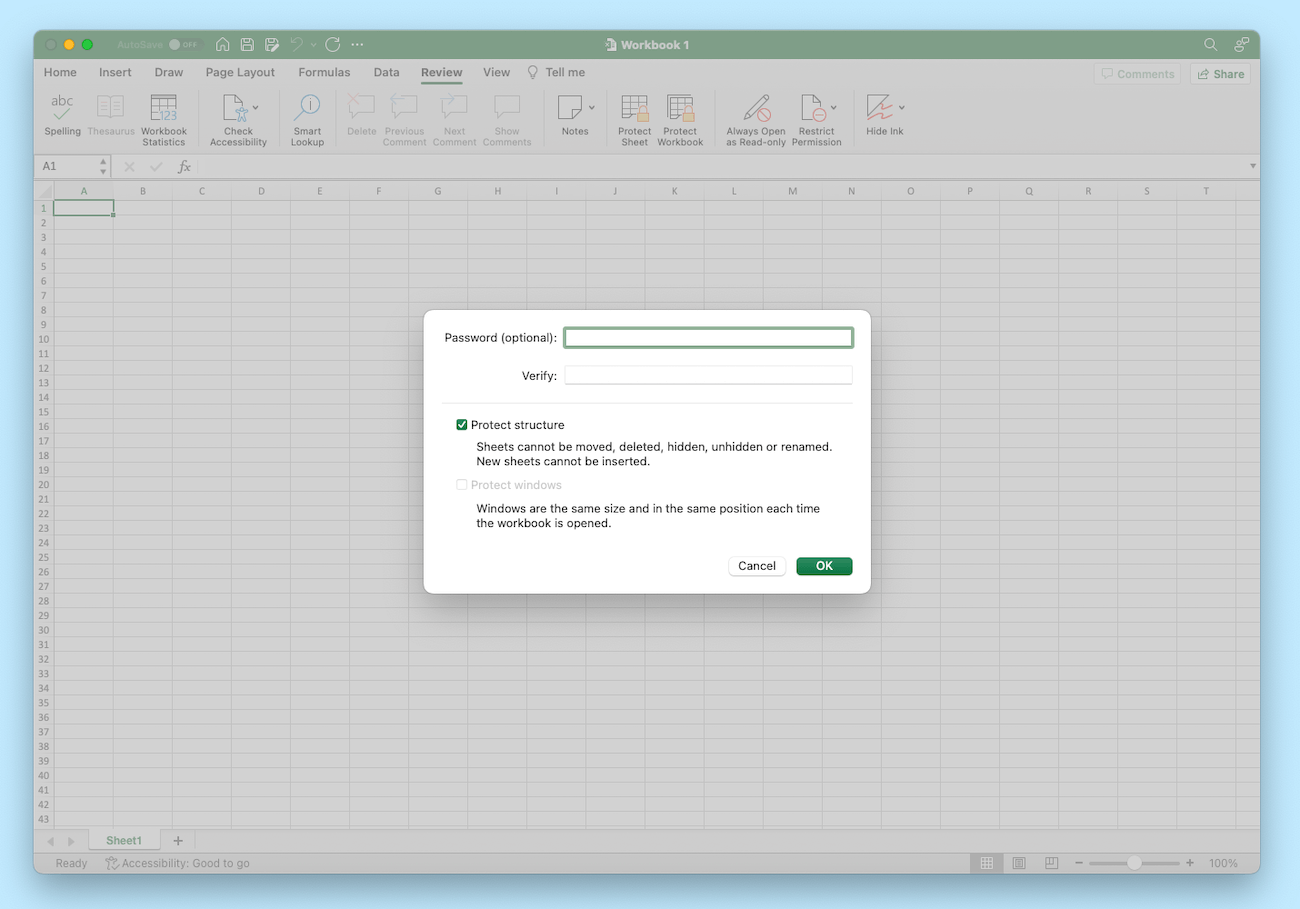
Anyone with access to the Workbook will now be required to enter a password in order to modify its structure in any way.
Use a password to control who can edit individual Worksheets
You can also use passwords to control who can edit what in specific Worksheets. This will lock the cells you select and stop people from changing, moving, or deleting any data contained in them.
For example, let’s say you have a status report Worksheet for your team. You could set a password so coworkers are able to add and change data in specific cells, but nothing else. This would give you granular control over which parts of the sheet are editable, and which ones are off limits.
To do this:
- Click Review > Protect Worksheet.
- Enter a password (if you don’t set a password, anyone can toggle editing access on or off)
- Confirm the password and select OK. The entire Worksheet is now locked.
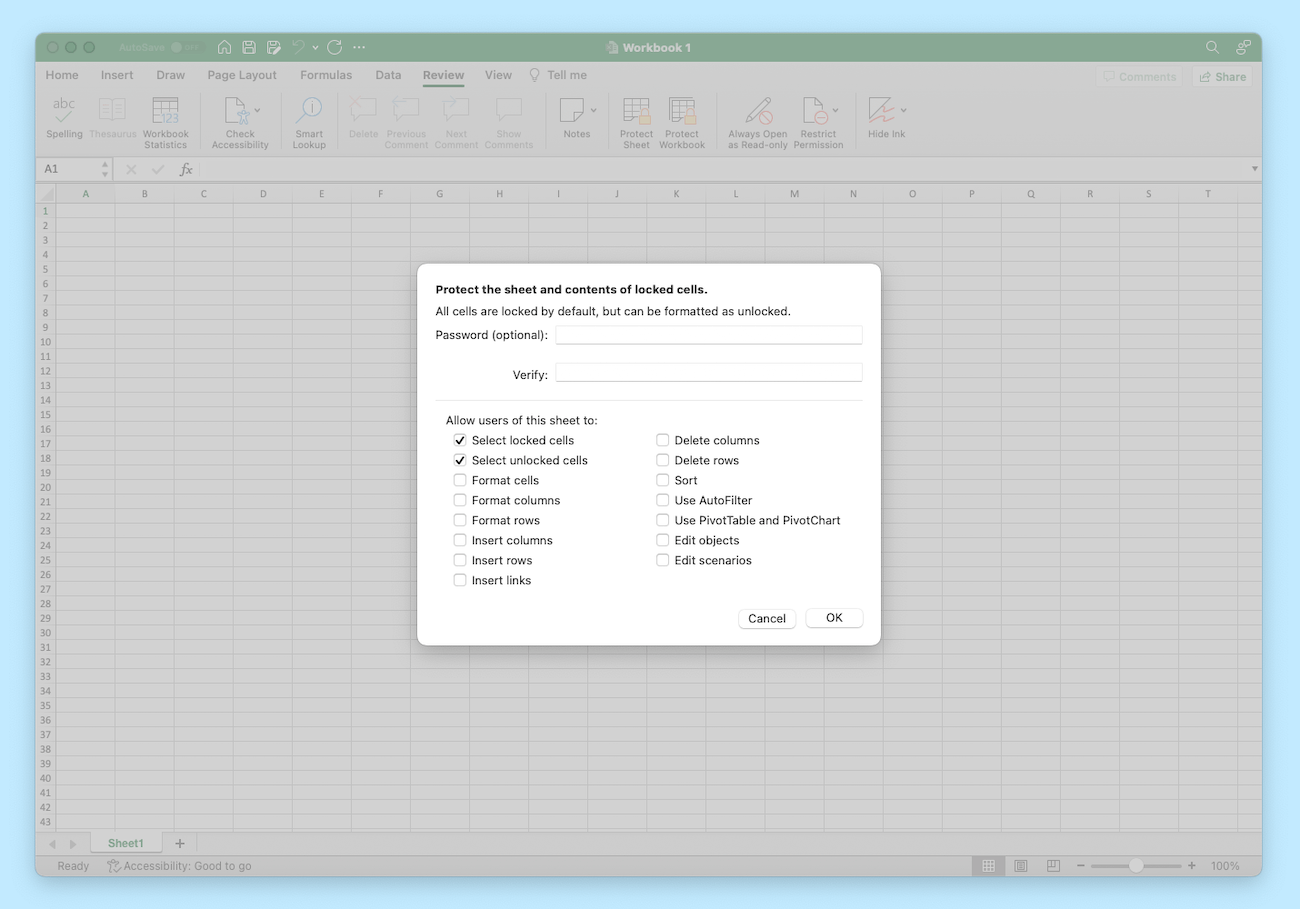
If you’re using a Windows PC, you can make specific cells editable by selecting Unlocked Ranges and entering the cell ranges you want unlocked.
Anyone who opens the Worksheet will now only be able to modify the unlocked cells (unless they unlock the Worksheet with the password).
How a password manager can help
Passwords are a great way to protect your most important Excel spreadsheets. But remember: if you forget or lose your passwords, Microsoft can’t retrieve them for you.
That’s where a password manager like 1Password comes in. A password manager helps you create, store, and use strong passwords for your Workbooks and Worksheets.
1Password also gives you a secure and convenient way to share access to your Excel passwords. You can do this with shared vaults, which are perfect for teams and families, or item sharing, which is ideal for one-off situations, and sharing passwords with people who don’t have a password manager.
Once you’ve finished working on a document, you can store it in 1Password, too – giving it the same level of protection as your passwords, addresses, and everything else important in your digital life.

 by 1Password on


Tweet about this post