At 1Password, we offer several developer solutions to make software development and deployments a smoother process. We’ve introduced tools like the tried-and-true 1Password CLI, which enables secure local development, and our SDKs so you can securely access your secrets from the cloud.
Managing environment variables is a crucial component of keeping any app secure and using 1Password’s tooling can help make that process more flexible and easier to update. If you’ve ever accidentally committed your .env file or secrets to your application’s version history, you’ll know the frustration of having to get them updated.
In this article, we’ll cover how to migrate a .env to use 1Password’s tooling. Specifically, you’ll learn:
- How to use 1Password’s VSCode plugin.
- How to create a vault for your application secrets
- How to use the 1Password SDKs to use those secrets
- How to rotate secrets to ensure your application stays secure.
By the end, you’ll have replaced a hardcoded .env file that could accidentally be exposed in your version history with references to secrets safely stored in a 1Password vault.
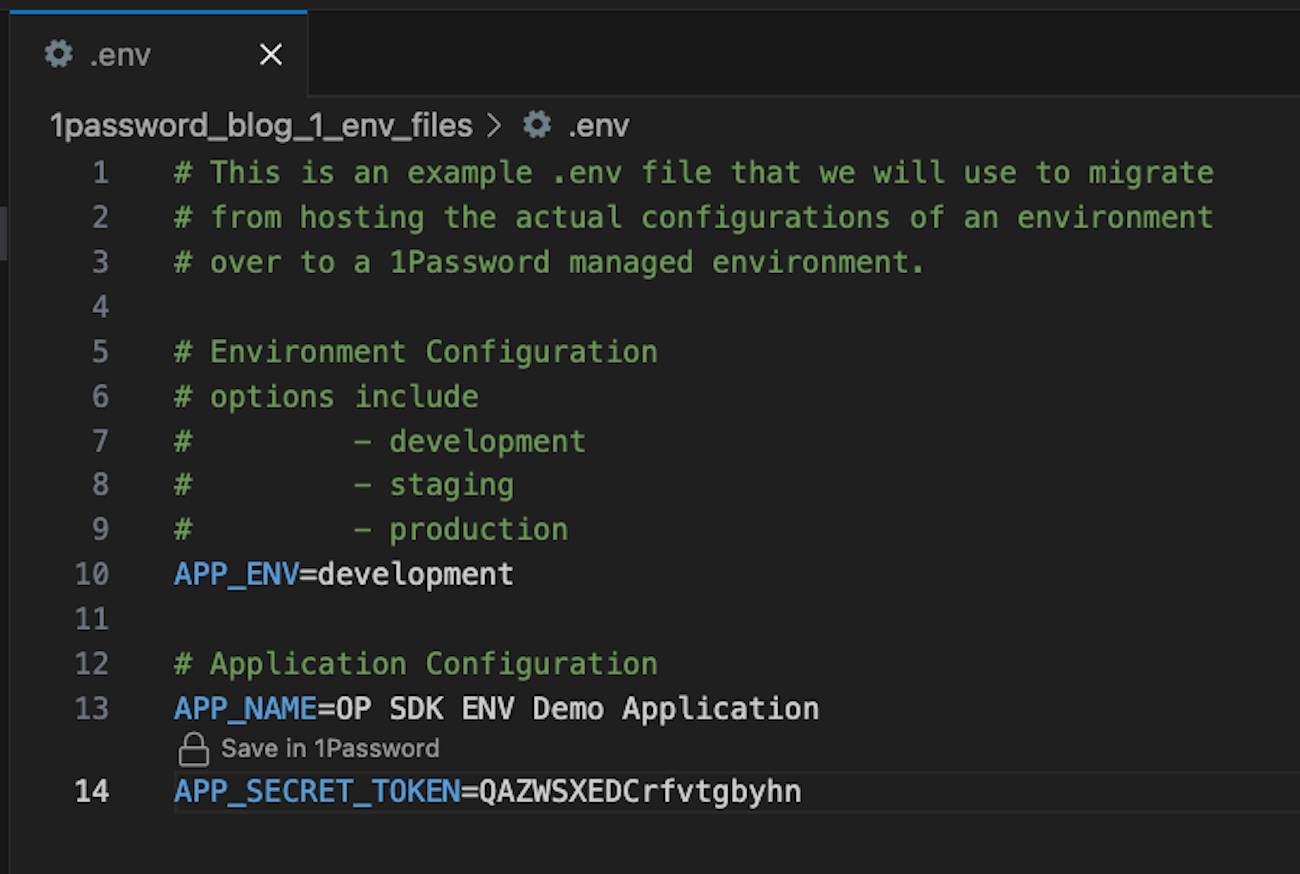
First, let’s look at a standard .env.

# This is an example .env file that we will use to migrate
# from hosting the actual configurations of an environment
# over to a 1Password-managed environment.

# Environment Configuration
# options include
#         - development
#         - staging
#         - production
APP_ENV=development

# Application Configuration
APP_NAME=OP SDJ ENV Demo Application

APP_SECRET_TOKEN=QAZWSXEDCrfvtgbyhn
On line 14, you’ll see the first step: there’s a hardcoded secret key set for our app. This is our starting point and what you’ll be updating to use 1Password instead.
Step 1: Install the 1Password for VS Code plugin
If you’re using VS Code as your editor of choice, be sure to install the 1Password for VS Code plugin. This will allow you to quickly identify developer secrets that should be stored in 1Password. Later in this article, you’ll learn how to do the migration manually, but we recommend using the plugin as it significantly speeds up the process.
Once you’ve installed the plugin, go ahead and tap on the “Save in 1Password” action. As the label on line 13 in the image above suggests, this will save the information in 1Password and swap it for a secret reference in your code. By swapping the secret for a “reference to a secret” stored in 1Password, you can safely commit this .env file to Git.
Now that the sensitive information has been stored within 1Password, you’ll want to make sure it’s available to other developers within your organization. You can do this by creating a “shared vault” and then adding your newly-saved secret to the vault. You’ll also want to share access to this vault using a Service Account (more on that later in this post).
Step 2: Set up access to a new vault within 1Password
It’s both insecure and inconvenient to share your entire 1Password account with other developers. Instead, you should create and share 1Password vaults. Vaults allow you to store multiple items in them and then choose who should be able to access them, keeping information on a need-to-know basis.
So far, you’ve saved a secret in 1Password. Over the next few steps you’ll learn how to organize and share a subset of secrets with other developers on your team.
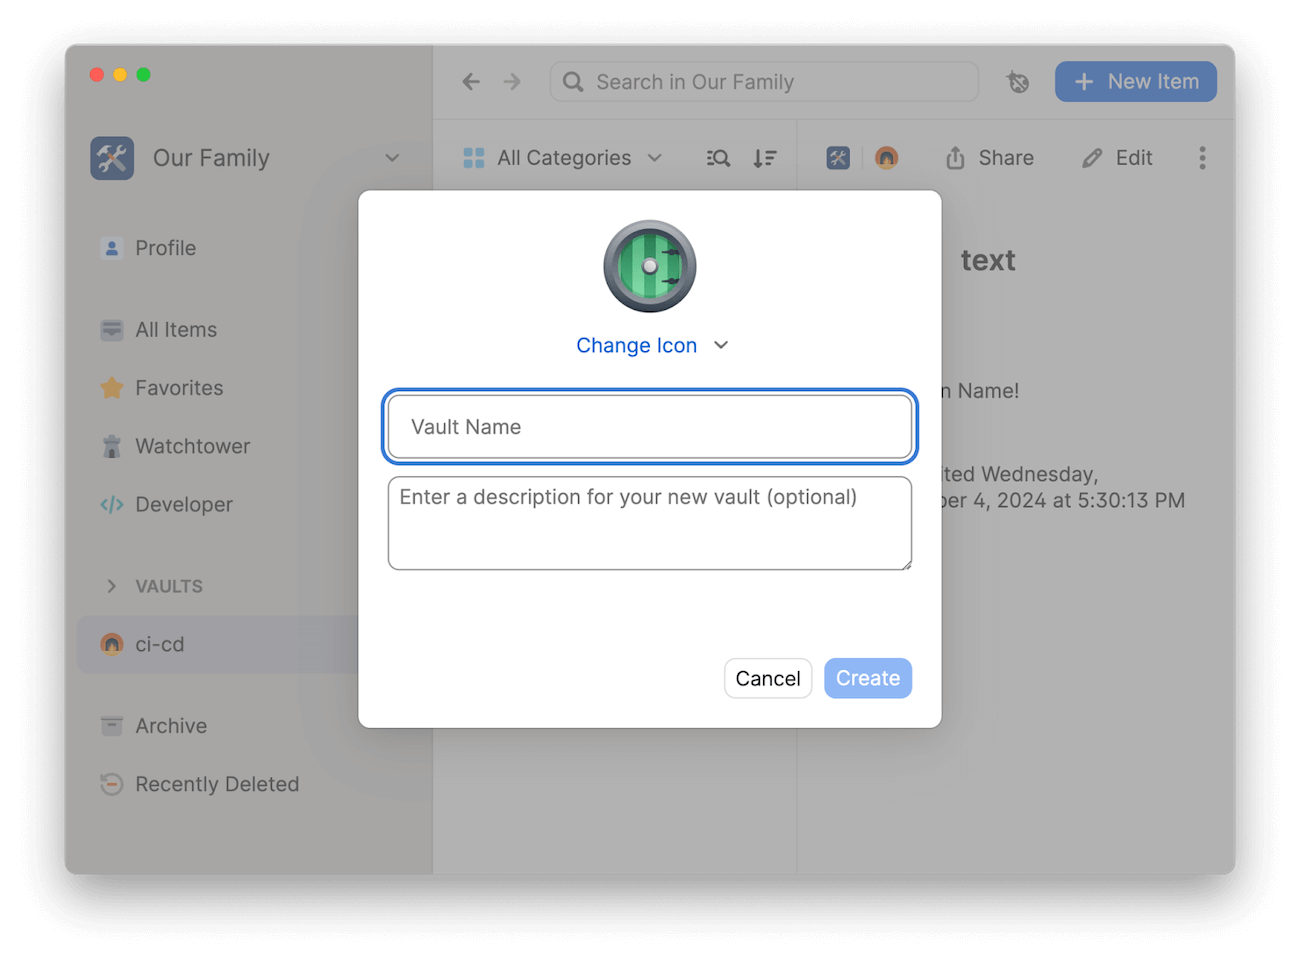
Step 2.1: Create a vault for your application secrets
Open 1Password and create a new vault called “ENV_Demo_Secrets”. Find the secret you saved earlier and drag it into this new vault.
Organizing secrets in this way ensures you only share application configuration settings and other sensitive information with other trusted developers. It also means no other secrets are shared with the people working on this application and your work and private information are kept separate. You are also able to revoke access to your vault at any time.
If you had multiple environments (e.g. Development, Staging, and Production) you could create separate vaults that are shared with different teams in your Development and Deployment pipeline.

To keep this article concise, let’s assume your application hasn’t gone into production just yet.

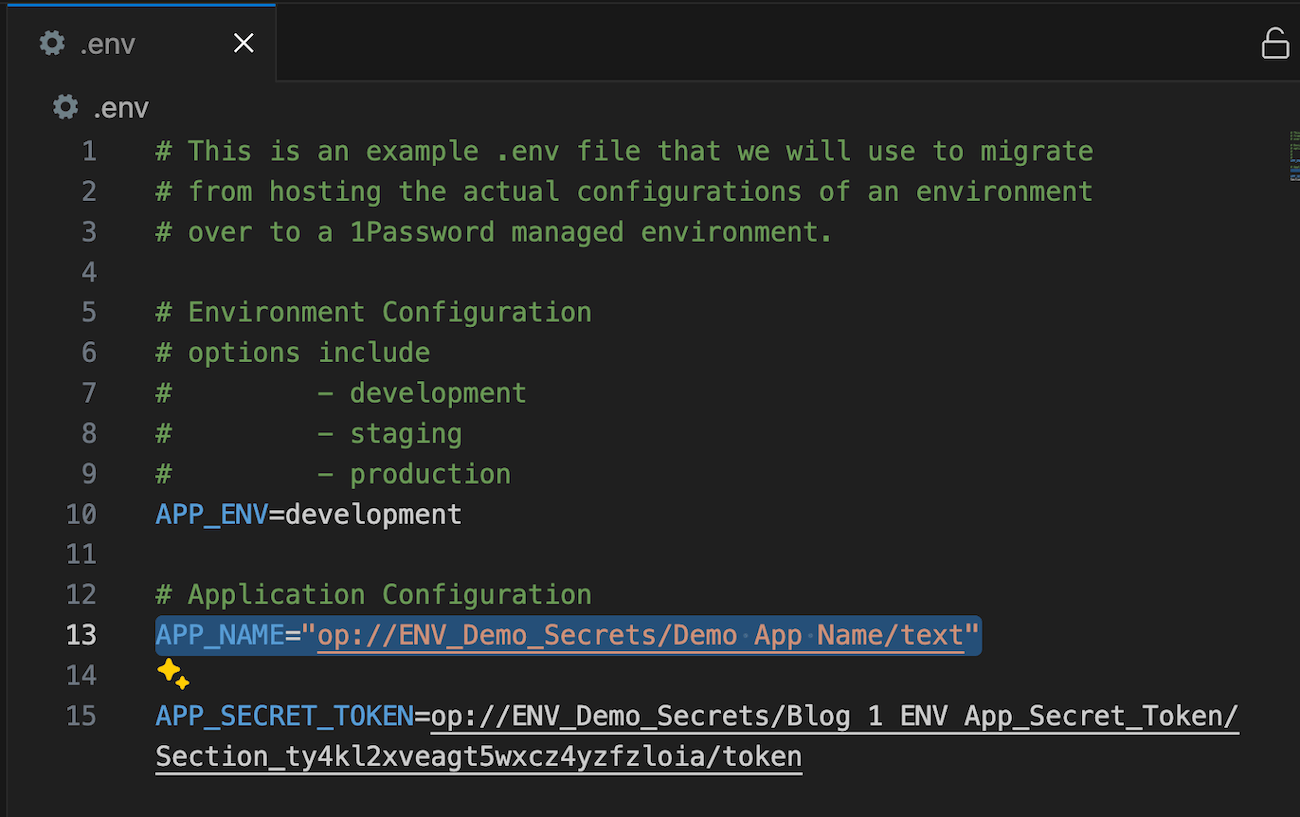
Next, you’ll need to update the secret reference because you moved the secret to your new “ENV_Demo_Secrets” vault.
In your .env file, update the name of the vault from “Vault” to “ENV_Demo_Secrets” to ensure the correct vault is referenced.

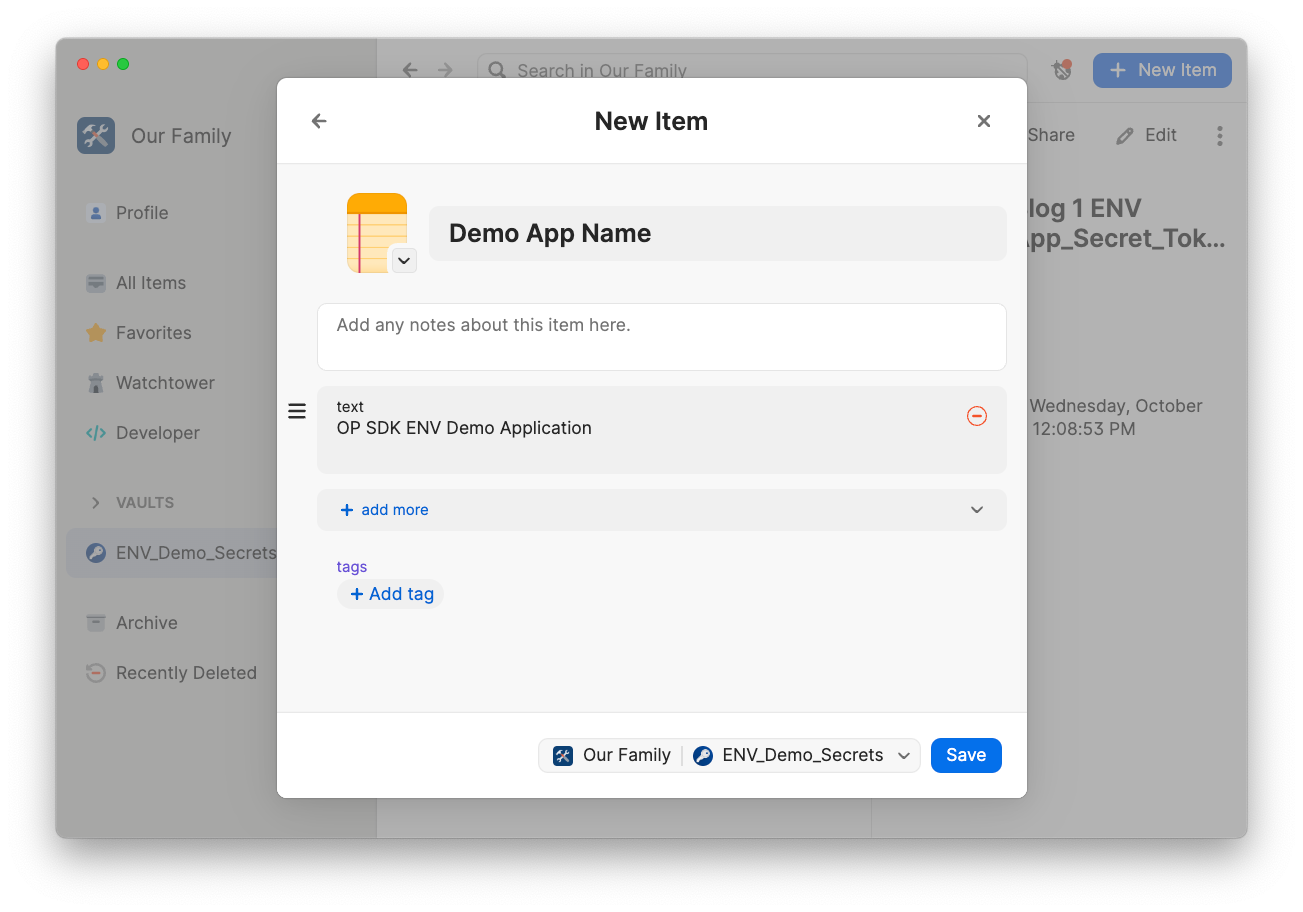
The next step is to store the APP_NAME in 1Password. In the 1Password desktop app, select the ENV_Demo_Secrets vault and then create a new item.

Once you’ve saved the new item, highlight the “text” area and select “Copy Secret Reference” from the pulldown menu that appears. With the Secret Reference in hand, you’re ready to replace as shown on line 13 in the .env file below. Now when you run the application, 1Password will replace the reference with the information stored in 1Password.

At this point, the application is completely broken because it doesn’t know how to load the 1Password secret references. This is okay because in the next step you’ll get rid of the concept of the .env file entirely. Instead, you’ll load this information using the recently-introduced 1Password SDKs.
Step 3: Use the 1Password SDKs to load environment variables from the Cloud instead of .env
For this step, let’s assume you’re running a remote automated job that kicks off a Python script. Due to hosting limitations you are unable to install the 1Password CLI. The desktop client does not allow programmatic access to secrets.
In this scenario, your only option is to use the 1Password SDKs to access your application secrets.
Below is a quick reference guide for each tool:
| Tool | Intended use |
|---|---|
| 1Password desktop app | Intended to be used as a desktop client. |
| 1Password CLI | Intended to be run from command line to inject secrets into your environment (may be limited due to hosting configuration). |
| 1Password SDKs | Intended for secret access from within applications and scripts. |
To accomplish this, complete the following steps:
- Create a Service Account to allow the SDK to access your shared vault from above.
- Install the 1Password SDKs as part of your scripts environment.
- Update your script to access your secrets via the 1Password SDK instead via the .env file.
Let’s get started:
Step 3.1: Generate a Service Account token
Watch this video to learn how to create a Service Account token:
By the end of the video you should have successfully generated a token. Keep this handy for the next step.
Step 3.2: Configure your application to reference the newly-created Service Account token
Next, you need to set up an environment variable similar to the following command line statement.
export OP_SERVICE_ACCOUNT_TOKEN=<your-service-account-token>
Depending on your hosting environment you may need to figure out a solution. In this example case, you can simply export the Service Account token so that it’s readable at runtime.
The above command line enables the SDKs to access your shared vault.
Step 3.3: Load secrets directly from your vault into your application
With 1Password’s SDKs you can easily migrate away from your old .env file and load the secrets into a configuration file on startup. Here’s an example in Python that uses the 1Password SDK to pull in secrets from your vault:
# env_migration_demo.py

# Import necessary modules
import asyncio
import os
from onepassword import Client

async def main():

 # You still need to load your Service Account Token from the OS, but let's do it without an additional package.
 token = os.getenv("OP_SERVICE_ACCOUNT_TOKEN")

 # Next create a 1Password client
 client = await Client.authenticate(auth=token, integration_name="DevRel Demo", integration_version="v0.0.1")

 # Now instead of pulling the information from the ENV file, let's pull it directly from your 1Password vault
 app_name = await client.secrets.resolve("op://ENV_Demo_Secrets/Demo App Name/text")
 app_secret_token = await client.secrets.resolve("op://ENV_Demo_Secrets/Blog 1 ENV App_Secret_Token/Section_ty4kl2xveagt5wxcz4yzfzloia/token")

 # Log it just for demo purposes
 print("Logging specific environment variables:")
 print(f"APP_NAME={app_name}")

if __name__ == '__main__':
 asyncio.run(main())
This code is available on GitHub if you would like to make changes or download it for personal use.
A good next step is to remove the old .env file from your environment and check to see if there are any missing variables you may have missed. You will also want to delete the .env file from your Git repo and potentially add it to your “.gitignore” file so that it can no longer be added to the shared repository going forward.
This will ensure you no longer have plaintext keys on your team’s hard drives that may be added to your repository in the future.
Step 4: Rotate your keys (optional)
Now that your application’s configuration is dynamic, you can freely edit it. Let’s test this by changing some information and rotating a key. To do this, simply edit the secret from 1Password and reload your application.
On startup, your application will load the secret from the 1Password servers (via the Service Account token) and continue building or executing. Use either the 1Password desktop app or sign in to 1Password.com to edit the item you’d like to change and finish the rotation. It’s that simple.
You can apply these four steps to any environment that 1Password supports along with the SDKs provided by 1Password. You can then be confident that your secrets have not been checked into code.
If there is a platform or environment that we don’t support, please drop us a note in the 1Password Community.
To learn more about this topic, Simon Barendse has a comprehensive post that takes a deeper dive into dynamic application configuration.

 by Phil Johnston on


